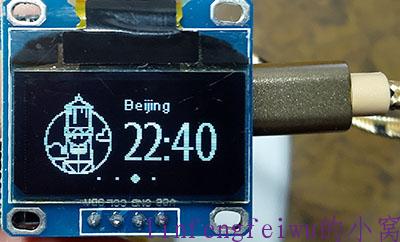
这个完全是个小玩意,国外找的基本照抄了稍微改了下。
可以显示纽约、伦敦、北京和东京这四个时间,设置好WiFi后自动联网获取时间,无需手动干预。
硬件:
D1 mini(esp8266)主板一块
OLED IIC显示模块一个
连接线若干(我是直接两个插在一起了)
链接:
OLED:
VCC —— VCC
GND —— GND
SDA —— D3
SCL —— D4
D1 mini使用arduino IDE:
首先打开IDE,文件—首选项,在附加开发板里面添加:
http://arduino.esp8266.com/stable/package_esp8266com_index.json
之后保存,在工具—开发板—开发板管理器,这里找到ESP8266安装。(如果下载不了定义请自行扶梯子)
之后在开发板那里选中Wemos D1(Retired)或者 Wemos D1 mini(这个可能高版本库会不能用但又没前面那个选项那就选NODE MCU 1.0)
代码:
#include <ESP8266WiFi.h>
#include <Ticker.h>
#include <JsonListener.h>
#include "SSD1306Wire.h"
#include "OLEDDisplayUi.h"
#include "Wire.h"
#include "WorldClockClient.h"
#include "icons.h"
#include "fonts.h"

/***************************
 * Begin Settings
 **************************/
// WIFI
const char* WIFI_SSID = "WiFi名称";
const char* WIFI_PWD = "WiFi密码";

// Setup
const int UPDATE_INTERVAL_SECS = 10 * 60; // Update every 10 minutes

// Display Settings
const int I2C_DISPLAY_ADDRESS = 0x3c;
const int SDA_PIN = D3;
const int SDC_PIN = D4;

// TimeClient settings

// Initialize the oled display for address 0x3c
// sda-pin=14 and sdc-pin=12

SSD1306Wire  display(I2C_DISPLAY_ADDRESS, SDA_PIN, SDC_PIN);
OLEDDisplayUi ui     ( &display );

/***************************
 * End Settings
 **************************/
String timeZoneIds [] = {"America/New_York", "Europe/London", "Asia/Shanghai", "Asia/Tokyo"};
WorldClockClient worldClockClient("de", "CH", "E, dd. MMMMM yyyy", 4, timeZoneIds);

// flag changed in the ticker function every 10 minutes
bool readyForUpdate = false;

String lastUpdate = "--";

Ticker ticker;

void updateData(OLEDDisplay *display) {
  drawProgress(display, 50, "Updating Time...");
  worldClockClient.updateTime();
  drawProgress(display, 100, "Done...");
  readyForUpdate = false;
  delay(1000);
}

void drawProgress(OLEDDisplay *display, int percentage, String label) {
  display->clear();
  display->setTextAlignment(TEXT_ALIGN_CENTER);
  display->setFont(ArialMT_Plain_10);
  display->drawString(64, 10, label);
  display->drawProgressBar(10, 28, 108, 12, percentage);
  display->display();
}

void drawClock(OLEDDisplay *display, int x, int y, int timeZoneIndex, String city, const char* icon) {
  display->setTextAlignment(TEXT_ALIGN_LEFT);
  display->setFont(ArialMT_Plain_10);
  display->drawString(x + 60, y + 5, city);
  display->setFont(Crushed_Plain_36);
  display->drawXbm(x, y, 60, 60, icon);
  display->drawString(x + 60, y + 15, worldClockClient.getHours(timeZoneIndex) + ":" + worldClockClient.getMinutes(timeZoneIndex));

}

void drawFrame1(OLEDDisplay *display, OLEDDisplayUiState* state, int16_t x, int16_t y) {
  drawClock(display, x, y, 0, "New York",  new_york_bits);
}

void drawFrame2(OLEDDisplay *display, OLEDDisplayUiState* state, int16_t x, int16_t y) {
  drawClock(display, x, y, 1, "London",  london_bits);
}

void drawFrame3(OLEDDisplay *display, OLEDDisplayUiState* state, int16_t x, int16_t y) {
  drawClock(display, x, y, 2, "Beijing",  austin_bits);
}

void drawFrame4(OLEDDisplay *display, OLEDDisplayUiState* state, int16_t x, int16_t y) {
  drawClock(display, x, y, 3, "Tokyo",  tokyo_bits);
}


void setReadyForWeatherUpdate() {
  Serial.println("Setting readyForUpdate to true");
  readyForUpdate = true;
}

// this array keeps function pointers to all frames
// frames are the single views that slide from right to left
FrameCallback frames[] = { drawFrame1, drawFrame2, drawFrame3, drawFrame4};
int numberOfFrames = 4;

void setup() {
  Serial.begin(115200);
  Serial.println();
  Serial.println();

  // initialize dispaly
  display.init();
  display.clear();
  display.display();

  //display.flipScreenVertically();
  display.setFont(ArialMT_Plain_10);
  display.setTextAlignment(TEXT_ALIGN_CENTER);
  display.setContrast(255);

  WiFi.begin(WIFI_SSID, WIFI_PWD);

  int counter = 0;
  while (WiFi.status() != WL_CONNECTED) {
    delay(500);
    Serial.print(".");
    display.clear();
    display.drawString(64, 10, "Connecting to WiFi");
    display.drawXbm(46, 30, 8, 8, counter % 3 == 0 ? activeSymbol : inactiveSymbol);
    display.drawXbm(60, 30, 8, 8, counter % 3 == 1 ? activeSymbol : inactiveSymbol);
    display.drawXbm(74, 30, 8, 8, counter % 3 == 2 ? activeSymbol : inactiveSymbol);
    display.display();

    counter++;
  }

  ui.setTargetFPS(30);

  // You can change this to
  // TOP, LEFT, BOTTOM, RIGHT
  ui.setIndicatorPosition(BOTTOM);

  // Defines where the first frame is located in the bar.
  ui.setIndicatorDirection(LEFT_RIGHT);

  // You can change the transition that is used
  // SLIDE_LEFT, SLIDE_RIGHT, SLIDE_TOP, SLIDE_DOWN
  ui.setFrameAnimation(SLIDE_LEFT);

  // Add frames
  ui.setFrames(frames, numberOfFrames);

  // Inital UI takes care of initalising the display too.
  ui.init();

  Serial.println("");

  updateData(&display);

  ticker.attach(UPDATE_INTERVAL_SECS, setReadyForWeatherUpdate);

}

void loop() {

  if (readyForUpdate && ui.getUiState()->frameState == FIXED) {
    updateData(&display);
  }

  int remainingTimeBudget = ui.update();

  if (remainingTimeBudget > 0) {
    // You can do some work here
    // Don't do stuff if you are below your
    // time budget.
    delay(remainingTimeBudget);
  }

}
用到的库文件:
https://github.com/squix78/esp8266-weather-station(主要文件,也是本文的参考链接,原始代码在examples里)
https://github.com/squix78/esp8266-oled-ssd1306
https://github.com/squix78/json-streaming-parser
效果图:


发表评论: