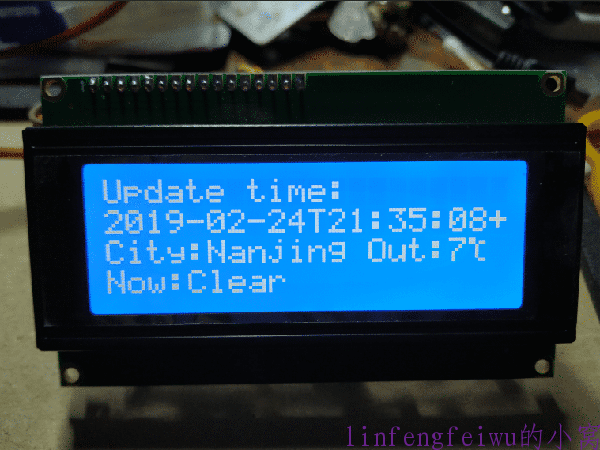
一个很简单的天气显示系统,采用lcd2004作为显示器,能够显示当前联网获得的天气,配合之前室内的那个温度来用,绝配啊。
连线很简单,只需将2004按IIC方式连接在esp8266上即可。
代码:
#include <ESP8266WiFi.h>
#include <ArduinoJson.h>
#include <Wire.h>

//GPIO4(SDA) GPIO5(SCL)
//I2C LCD:
#include <Wire.h> // Comes with Arduino IDE
#include <LiquidCrystal_I2C_DS3231.h>

// Set the LCD I2C address
#define I2C_ADDR    0x27  // Define I2C Address for the PCF8574T
//---(Following are the PCF8574 pin assignments to LCD connections )----
// This are different than earlier/different I2C LCD displays

#define Rs_pin  0
#define Rw_pin  1
#define En_pin  2
#define BACKLIGHT_PIN  3
#define D4_pin  4
#define D5_pin  5
#define D6_pin  6
#define D7_pin  7

#define  LED_OFF  0
#define  LED_ON  1

/*-----( Declare objects )-----*/
LiquidCrystal_I2C  lcd(I2C_ADDR,En_pin,Rw_pin,Rs_pin,D4_pin,D5_pin,D6_pin,D7_pin);

#define ledPin 14                          // 定义ledPin连接到GPIO14
//年
byte Nian[8] = {0b01000,0b01111,0b10010, 0b01111, 0b01010, 0b11111, 0b00010, 0b00010};
//月
byte Yue[8] = {0b01111, 0b01001, 0b01111, 0b01001, 0b01111, 0b01001, 0b10011, 0b00001};
//日
byte Ri[8] = {0b01111, 0b01001, 0b01001, 0b01111, 0b01001, 0b01001, 0b01111, 0b00000};
//摄氏度
byte du[8] = {0b11000,0b11011,0b00100, 0b00100, 0b00100, 0b00100, 0b00011, 0b00000};

const char* ssid     = " XXXXXX";         // XXXXXX -- 使用时请修改为当前你的 wifi ssid
const char* password = " XXXXXX";         // XXXXXX -- 使用时请修改为当前你的 wifi 密码
const char* host = "api.seniverse.com";
const char* APIKEY = "wcmquevztdy1jpca";        //API KEY
const char* city = "nanjing";
const char* language = "en";//zh-Hans 简体中文  会显示乱码

const unsigned long BAUD_RATE = 115200;                   // serial connection speed
const unsigned long HTTP_TIMEOUT = 5000;               // max respone time from server
const size_t MAX_CONTENT_SIZE = 1000;                   // max size of the HTTP response

// 我们要从此网页中提取的数据的类型
struct UserData {
  char city[16];//城市名称
  char weather[32];//天气介绍(多云...)
  char temp[16];//温度
  char udate[32];//更新时间
};

WiFiClient client;
char response[MAX_CONTENT_SIZE];
char endOfHeaders[] = "\r\n\r\n";

/**
* @Desc 初始化操作
*/
void setup() {

  lcd.begin(20, 4);
    // Switch on the backlight
   lcd.setBacklightPin(BACKLIGHT_PIN,POSITIVE);
   lcd.setBacklight(LED_ON);
    lcd.createChar(0, Nian);
    lcd.createChar(1, Yue);
    lcd.createChar(2, Ri);
    lcd.createChar(3, du);
  WiFi.mode(WIFI_STA);     //设置esp8266 工作模式
  Serial.begin(BAUD_RATE);
  delay(10);
  Serial.println();
  Serial.println();
  Serial.print("Connecting to ");//写几句提示,哈哈
  Serial.println(ssid);
  WiFi.begin(ssid, password);   //连接wifi
  while (WiFi.status() != WL_CONNECTED) {
    //这个函数是wifi连接状态,返回wifi链接状态
    delay(100);
    Serial.print(".");
  }
  Serial.println("");
  Serial.println("WiFi connected");
  delay(100);
  Serial.println("IP address: ");
  Serial.println(WiFi.localIP());//WiFi.localIP()返回8266获得的ip地址
  client.setTimeout(HTTP_TIMEOUT);

}

/**
* @Desc  主函数
*/

void loop() {


  while (!client.connected()){
     if (!client.connect(host, 80)){
         Serial.println("connection....");
         delay(100);
     }
  }
  if (sendRequest(host, city, APIKEY) && skipResponseHeaders()) {
    clrEsp8266ResponseBuffer();
    readReponseContent(response, sizeof(response));
    UserData userData;
    if (parseUserData(response, &userData)) {
      printUserData(&userData);
    }
  }
  delay(300);//每5s调用一次
}

/**
* @发送请求指令
*/
bool sendRequest(const char* host, const char* cityid, const char* apiKey) {
  // We now create a URI for the request
  //心知天气
  String GetUrl = "/v3/weather/now.json?key=";
  GetUrl += apiKey;
  GetUrl += "&location=";
  GetUrl += city;
  GetUrl += "&language=";
  GetUrl += language;
  // This will send the request to the server
  client.print(String("GET ") + GetUrl + " HTTP/1.1\r\n" +
               "Host: " + host + "\r\n" +
               "Connection: close\r\n\r\n");
  Serial.println("create a request:");
  Serial.println(String("GET ") + GetUrl + " HTTP/1.1\r\n" +
               "Host: " + host + "\r\n" +
               "Connection: close\r\n");
  delay(100);
  return true;
}

/**
* @Desc 跳过 HTTP 头,使我们在响应正文的开头
*/
bool skipResponseHeaders() {
  // HTTP headers end with an empty line
  bool ok = client.find(endOfHeaders);
  if (!ok) {
    Serial.println("No response or invalid response!");
  }
  return ok;
}

/**
* @Desc 从HTTP服务器响应中读取正文
*/
void readReponseContent(char* content, size_t maxSize) {
  size_t length = client.peekBytes(content, maxSize);
  delay(100);
  Serial.println("Get the data from Internet!");
  content[length] = 0;
  Serial.println(content);
  Serial.println("Read data Over!");
  client.flush();//这句代码需要加上  不然会发现每隔一次client.find会失败
}

/**
 * @Desc 解析数据
 * 数据格式如下:
 * {
 *    "results": [
 *        {
 *            "location": {
 *                "id": "WX4FBXXFKE4F",
 *                "name": "北京",
 *                "country": "CN",
 *                "path": "北京,北京,中国",
 *                "timezone": "Asia/Shanghai",
 *                "timezone_offset": "+08:00"
 *            },
 *            "now": {
 *                "text": "多云",
 *                "code": "4",
 *                "temperature": "23"
 *            },
 *            "last_update": "2017-09-13T09:51:00+08:00"
 *        }
 *    ]
 *}
 */
bool parseUserData(char* content, struct UserData* userData) {
//    -- 根据我们需要解析的数据来计算JSON缓冲区最佳大小
//   如果你使用StaticJsonBuffer时才需要
//    const size_t BUFFER_SIZE = 1024;
//   在堆栈上分配一个临时内存池
//    StaticJsonBuffer<BUFFER_SIZE> jsonBuffer;
//    -- 如果堆栈的内存池太大,使用 DynamicJsonBuffer jsonBuffer 代替
  DynamicJsonBuffer jsonBuffer;

  JsonObject& root = jsonBuffer.parseObject(content);

  if (!root.success()) {
    Serial.println("JSON parsing failed!");
    return false;
  }

  //复制我们感兴趣的字符串
  strcpy(userData->city, root["results"][0]["location"]["name"]);
  strcpy(userData->weather, root["results"][0]["now"]["text"]);
  strcpy(userData->temp, root["results"][0]["now"]["temperature"]);
  strcpy(userData->udate, root["results"][0]["last_update"]);
  //  -- 这不是强制复制,你可以使用指针,因为他们是指向“内容”缓冲区内,所以你需要确保
  //   当你读取字符串时它仍在内存中
  return true;
}

// 打印从JSON中提取的数据
void printUserData( struct UserData* userData) {
  Serial.println("Print parsed data :");
 lcd.clear();
 lcd.setCursor(0,0);
 lcd.print("Update time:");
 lcd.setCursor(0,1);
 lcd.print(userData->udate);
 lcd.setCursor(0,2);
 lcd.print("City:");
 lcd.print(userData->city);
 lcd.print(" Out:");
 lcd.print(userData->temp);
 lcd.write(byte(3));
 lcd.setCursor(0,3);
 lcd.print("Now:");
 lcd.print(userData->weather);
 delay(4*1000);
}

// 关闭与HTTP服务器连接
void stopConnect() {
  Serial.println("Disconnect");
  client.stop();
}

void clrEsp8266ResponseBuffer(void){
    memset(response, 0, MAX_CONTENT_SIZE);      //清空
}
lcd2004的使用基本参照1602来,库也是一样的,只要改变下显示位置就行了。获取网络天气的代码来自:http://bbs.doit.am/forum.php?mod=viewthread&tid=442&extra=。没有自己去申请api,直接用了原作者的。哪一天失效了再自己改吧。
成品图:


发表评论: