-
谈谈自己最喜欢的三个游戏 2018-5-4
闲聊时间,聊聊我最喜欢的三个游戏。 第一个就是《QQ飞车》了,这个游戏是我玩的最久的一个了,也是每台电脑必装的,虽然现在游戏大小越来越大,但还是偶尔拿出来玩玩。现在又有手游版的了,玩起来也方便了。 第二个就是《我的世界》了,当初接触到这款游戏还是在一个同学的手机上,后来发现有电脑版,还能联机一起玩,从此便一发不可收拾了。和基友一起可以说是中了这个游戏的毒了。。。 第三个就是《OSU!》了,这是一个音乐类游戏,当初是想玩节奏大师的,结果搜到了一个这个,也是果断入坑,还特地为此买了数位板来玩。曾经一度某首歌打不到S就不睡觉。。。
-
1602时钟更新一个带温湿度的代码 2018-4-25
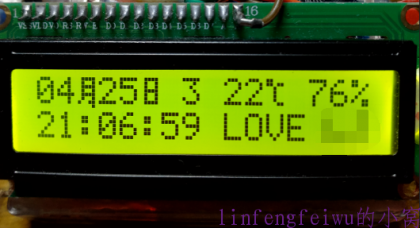
又是一个版本改进了,这次添加了DHT11温湿度传感器,来显示实时温湿度。到此,这个时钟基本已经比较完美了。 DHT11接法和库文件见:http://blog.readgroup.cn/post/55 其他的库文件见:http://blog.readgroup.cn/post/70 直接上代码: #include <Wire.h> #include <ds3231.h> #include <LiquidCrystal_I2C_DS3231.h> #define BUFF_MAX 128 //DHT11 Sensor: #include "DHT.h" #define DHTPIN 12 // what digital pin we're connected to #define DHTTYPE DHT11 // DHT 11 DHT dht(DHTPIN, DHTTYPE); //****************************************Define I2C LCD Display ********************************* #define I2C_ADDR 0x27 // Define I2C Address for the PCF8574T //---(Following are the PCF8574 pin assignments to LCD connections )---- // This are different than earlier/different I2C LCD displays #define Rs_pin 0 #define Rw_pin 1 #define En_pin 2 #define BACKLIGHT_PIN 3 #define D4_pin 4 #define D5_pin 5 #define D6_pin 6 #define D7_pin 7 #define LED_OFF 0 #define LED_ON 1 /*-----( Declare objects )-----*/ LiquidCrystal_I2C lcd(I2C_ADDR,En_pin,Rw_pin,Rs_pin,D4_pin,D5_pin,D6_pin,D7_pin); //************************************ END LCD DISPLAY ******************************************* //摄氏度 byte Nian[8] = {0b11000,0b11011,0b00100, 0b00100, 0b00100, 0b00100, 0b00011, 0b00000}; //月 byte Yue[8] = {0b01111, 0b01001, 0b01111, 0b01001, 0b01111, 0b01001, 0b10011, 0b00001}; //日 byte Ri[8] = {0b01111, 0b01001, 0b01001, 0b01111, 0b01001, 0b01001, 0b01111, 0b00000}; uint8_t time[8]; char recv[BUFF_MAX]; unsigned int recv_size = 0; unsigned long prev, interval = 1000; void setup() { Serial.begin(9600); Wire.begin(); DS3231_init(DS3231_INTCN); memset(recv, 0, BUFF_MAX); Serial.println("GET time"); //**************************LCD Setup******************************** lcd.begin (16,2); // initialize the lcd // Switch on the backlight lcd.setBacklightPin(BACKLIGHT_PIN,POSITIVE); lcd.setBacklight(LED_ON); //***************************END LCD Setup******************************** Serial.println("Setting time"); // setTheTime("304022129022016"); // ssmmhhWDDMMYYYY set time once in the given format lcd.createChar(0, Nian); lcd.createChar(1, Yue); lcd.createChar(2, Ri); dht.begin(); } void loop() { int hhhh = dht.readHumidity(); int tttt = dht.readTemperature(); char tempF[6]; float temperature; char buff[BUFF_MAX]; unsigned long now = millis(); struct ts t; // show time once in a while if (now - prev > interval){ DS3231_get(&t); //Get time temperature = DS3231_get_treg(); //Get temperature dtostrf(temperature, 5, 1, tempF); lcd.clear(); lcd.setCursor(0,0); if(t.mon<10) { lcd.print("0"); } lcd.print(t.mon); lcd.write(byte(1)); if(t.mday<10) { lcd.print("0"); } lcd.print(t.mday); lcd.write(byte(2)); lcd.print(" "); lcd.print(t.wday); lcd.print(" "); lcd.print(tttt); lcd.write(byte(0)); lcd.print(" "); lcd.print(hhhh); lcd.print("%"); lcd.setCursor(0,1); //Go to second line of the LCD Screen if(t.hour<10) { lcd.print("0"); } lcd.print(t.hour); lcd.print(":"); if(t.min<10) { lcd.print("0"); } lcd.print(t.min); lcd.print(":"); if(t.sec<10) { lcd.print("0"); } lcd.print(t.sec); lcd.print(" LOVE ");//这里用来显示自定义字符,这行不要可以显示DS3231的温度 lcd.print(tempF); lcd.print((char)223); lcd.print("C"); prev = now; } } void setTheTime(char *cmd) { struct ts t; // ssmmhhWDDMMYYYY set time t.sec = inp2toi(cmd, 0); t.min = inp2toi(cmd, 2); t.hour = inp2toi(cmd, 4); t.wday = inp2toi(cmd, 6); t.mday = inp2toi(cmd, 7); t.mon = inp2toi(cmd, 9); t.year = inp2toi(cmd, 11) * 100 + inp2toi(cmd, 13); DS3231_set(t); Serial.println("OK"); } void printWeek(int week) { switch(week) { case 1: lcd.print("Mon");break; case 2: lcd.print("Tue");break; case 3: lcd.print("Wed");break; case 4: lcd.print("Thu");break; case 5: lcd.print("Fri");break; case 6: lcd.print("Sat");break; case 7: lcd.print("Sun");break; default: lcd.print(" E ");break; } } 效果图:
-
NanoPiNEO挂载移动硬盘 2018-4-24
之前装有aira2下载器,家里的宽带终于是升了100M光纤,那下载速度杠杠的。晚上用NanoPiNEO下东西又不耽误玩比开电脑下还省电,就是之前只靠SD卡是受不住了,必须外接移动硬盘来下了。 移动硬盘是NTFS格式的,方便每次下完东西直接拿过来拷电脑上。 首先插上移动硬盘,登录SSH,输入 fdisk -l 查看移动硬盘位置,我的在/dev/sda2. 然后安装所需软件包: sudo apt-get install fuse-utils ntfs-3g 加载内核模块: modprobe fuse 编辑fstab让移动硬盘开机自动挂载: sudo nano /etc/fstab 在最后一行添加如下内容 /dev/sda2 /mnt/dietpi_userdata/usb ntfs-3g defaults,noexec,umask=0000 0 0 保存重启,即可生效(这里注意,一旦使用了开机自动挂载,每次开机移动硬盘一定要连着,不然系统会启动失败就 进不去了) (如果因此不能通过网络连接SSH进系统,可以使用USB串口登录,设置好com端口,波特率设为115200,先连接好USB,打开软件,再开机。然后修改掉这里错误的地方即可。) 如果挂载fat32式则添加: /dev/sda2 /mnt/usb auto defaults,noexec,umask=0000 0 0 如果挂载ext2式则添加: /dev/sda2 /mnt/usb ext2 rw,defaults 0 0 (格式化硬盘: 查看硬盘:sudo fdisk -l 先卸载:sudo umount /dev/sda2 再格式化:sudo mkfs.ext2 /dev/sda2 ) 等重启好后输入df –h查看硬盘是否挂载成功即可。之后在aira2的下载路径里填入相关路径即可。
-
自制1602时钟再更新一个IIC1602代码 2018-4-5
这次的代码所使用的硬件上1602换成了IIC,不用复杂地接线了。 把1602和DS3231按如下接好即可: VCC —— VCC GND —— GND SCL —— SCL/A5 SDA —— SDA/A4 代码(注意库名称和1602地址): #include <Wire.h> #include <ds3231.h> #include <LiquidCrystal_I2C_DS3231.h> #define BUFF_MAX 128 //****************************************Define I2C LCD Display ********************************* #define I2C_ADDR 0x27 // Define I2C Address for the PCF8574T //---(Following are the PCF8574 pin assignments to LCD connections )---- // This are different than earlier/different I2C LCD displays #define Rs_pin 0 #define Rw_pin 1 #define En_pin 2 #define BACKLIGHT_PIN 3 #define D4_pin 4 #define D5_pin 5 #define D6_pin 6 #define D7_pin 7 #define LED_OFF 0 #define LED_ON 1 /*-----( Declare objects )-----*/ LiquidCrystal_I2C lcd(I2C_ADDR,En_pin,Rw_pin,Rs_pin,D4_pin,D5_pin,D6_pin,D7_pin); //************************************ END LCD DISPLAY ******************************************* //年 byte Nian[8] = {0b01000,0b01111,0b10010, 0b01111, 0b01010, 0b11111, 0b00010, 0b00010}; //月 byte Yue[8] = {0b01111, 0b01001, 0b01111, 0b01001, 0b01111, 0b01001, 0b10011, 0b00001}; //日 byte Ri[8] = {0b01111, 0b01001, 0b01001, 0b01111, 0b01001, 0b01001, 0b01111, 0b00000}; uint8_t time[8]; char recv[BUFF_MAX]; unsigned int recv_size = 0; unsigned long prev, interval = 1000; void setup() { Serial.begin(9600); Wire.begin(); DS3231_init(DS3231_INTCN); memset(recv, 0, BUFF_MAX); Serial.println("GET time"); //**************************LCD Setup******************************** lcd.begin (16,2); // initialize the lcd // Switch on the backlight lcd.setBacklightPin(BACKLIGHT_PIN,POSITIVE); lcd.setBacklight(LED_ON); //***************************END LCD Setup******************************** Serial.println("Setting time"); // setTheTime("304022129022016"); // ssmmhhWDDMMYYYY set time once in the given format lcd.createChar(0, Nian); lcd.createChar(1, Yue); lcd.createChar(2, Ri); } void loop() { char tempF[6]; float temperature; char buff[BUFF_MAX]; unsigned long now = millis(); struct ts t; // show time once in a while if (now - prev > interval){ DS3231_get(&t); //Get time temperature = DS3231_get_treg(); //Get temperature dtostrf(temperature, 5, 1, tempF); lcd.clear(); lcd.setCursor(0,0); lcd.print(t.year); lcd.write(byte(0)); if(t.mon<10) { lcd.print("0"); } lcd.print(t.mon); lcd.write(byte(1)); if(t.mday<10) { lcd.print("0"); } lcd.print(t.mday); lcd.write(byte(2)); lcd.print(" "); printWeek(t.wday); lcd.setCursor(0,1); //Go to second line of the LCD Screen if(t.hour<10) { lcd.print("0"); } lcd.print(t.hour); lcd.print(":"); if(t.min<10) { lcd.print("0"); } lcd.print(t.min); lcd.print(":"); if(t.sec<10) { lcd.print("0"); } lcd.print(t.sec); lcd.print(' '); lcd.print(tempF); lcd.print((char)223); lcd.print("C"); prev = now; } } void setTheTime(char *cmd) { struct ts t; // ssmmhhWDDMMYYYY set time t.sec = inp2toi(cmd, 0); t.min = inp2toi(cmd, 2); t.hour = inp2toi(cmd, 4); t.wday = inp2toi(cmd, 6); t.mday = inp2toi(cmd, 7); t.mon = inp2toi(cmd, 9); t.year = inp2toi(cmd, 11) * 100 + inp2toi(cmd, 13); DS3231_set(t); Serial.println("OK"); } void printWeek(int week) { switch(week) { case 1: lcd.print("Mon");break; case 2: lcd.print("Tue");break; case 3: lcd.print("Wed");break; case 4: lcd.print("Thu");break; case 5: lcd.print("Fri");break; case 6: lcd.print("Sat");break; case 7: lcd.print("Sun");break; default: lcd.print(" Error ");break; } } 效果图: 原始代码和库来源:https://www.youtube.com/watch?v=eDUueSq_mcg
-
一个页面访问统计的php代码 2018-2-24
通过文件计数,每刷新一次页面就加一次。 代码: <?php //数字输出网页计数器 $max_len = 9; $CounterFile = "counter.dat"; if(!file_exists($CounterFile)){ //如果计数器文件不存在 $counter = 0; $cf = fopen($CounterFile,"w"); //打开文件 fputs($cf,'0'); //初始化计数器 fclose($cf); //关闭文件 } else{ //取回当前计数器的值 $cf = fopen($CounterFile,"r"); $counter = trim(fgets($cf,$max_len)); fclose($cf); } $counter++; //计数器加一 $cf = fopen($CounterFile,"w"); //写入新的数据 fputs($cf,$counter); fclose($cf); ?> <span>访问统计: <?php echo $counter; //输出计数器 ?> 人次!</span>
-
树莓派使用OLED屏笔记 2018-2-12
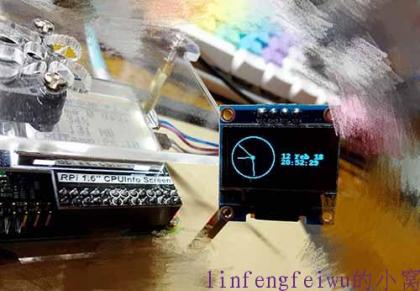
之前多的一个OLED屏幕,拿来给树莓派试试。 屏幕是SSD1306主控IIC屏,找了一圈找到一个库,试了试还可以。 按以下步骤安装: sudo apt-get update sudo usermod -a -G i2c,spi,gpio pi sudo apt install python-dev python-pip libfreetype6-dev libjpeg-dev build-essential sudo apt install libsdl-dev libportmidi-dev libsdl-ttf2.0-dev libsdl-mixer1.2-dev libsdl-image1.2-dev 之后重启一次。 接着: git clone https://github.com/rm-hull/luma.examples.git cd luma.examples sudo -H pip install -e . 如果中途少些什么东西,根据提示安装即可,然后再继续。 全部结束后用python examples/clock.py来启动,效果如上图。不需要了按ctrl+c结束。 要是需要开机自启在/etc/rc.local中加一句: cd /home/pi/文件路径 && python clock.py & 库下载:https://github.com/rm-hull/luma.examples
-
Arduino使用ENC28J60网络模块 2018-2-8
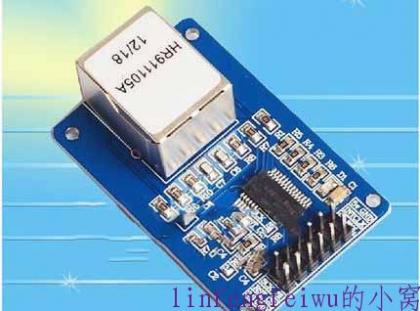
买了块ENC28J60网络模块来做网络实验的,实验到还没做,先记录下这个模块的用法。 我这个和网上找的资料的不太一样,是5V驱动的,接3.3不工作。 硬件连接: Vcc —— 5V 【注意电压!!】 GND —— GND RESET —— RESET; CS —— 片选,与“ether.begin()”的第三个参数一致;测试代码接D10; SI —— D11 (MOSI 口,见下图); SO —— D12 (MISO 口,见下图); SCK —— D13 (SCK 口,见下图); 库文件:https://github.com/jcw/ethercard 因为具体的东西还没做,只是先拿示例中的代码试了试功能。 连线参考链接:http://blog.csdn.net/sdlgq/article/details/50371470
-
使用highlight.js为xhEditor编辑器增加代码高亮功能 2018-2-7
最近在修改一个简易博客,后台使用了xhEditor作为编辑器。比较小巧简单,一番折腾后可以使用了,但还少了个代码高亮的功能。 去找相关资料,试了半天还是不行,教程根本无法成功。后来又找到xhEditor的文档,发现demo9给了一个示例,但用的是prettify的代码高亮,这和之前搜到的文章是一样的啊,不会用。之后又开始折腾。 最终终于使用highlight.js成功实现了!下面说说过程。 准备材料: highlight.js xhEditor 全部下载他们当前最新的完整包,要用到里面的东西。 先测试了下highlight.js。根据官方文档,在文章页添加以下代码: <link rel="stylesheet" href="/path/to/styles/default.css"> <script src="/path/to/highlight.pack.js"></script> <script>hljs.initHighlightingOnLoad();</script> 我是直接把代码添加到了文章的模板页面里面,以保证正常加载。前两个在下载的包里找到对应的css和js文件,更改好路径即可。主题文件css可以换自己喜欢的,去官方demo页面预览后选一个就好。 这个弄好后我去后台根据说明直接把 <pre><code class="html">...</code></pre> 这句写在文件里测试,成功的。其中class可以不填或者填入对应语言。测试效果如下: 代码高亮正常,没有问题。下面就是要整合进xhEditor了。我是研究了demo9好久,删了改改了添的,最终折腾出来了。 首先我们只需要demo9的其中这部分代码: <style type="text/css"> .btnCode { background:transparent url(prettify/code.gif) no-repeat 16px 16px; background-position:2px 2px; } </style> <script type="text/javascript" src="../jquery/jquery-1.4.4.min.js"></script> <script type="text/javascript" src="../xheditor-1.2.2.min.js"></script> <script type="text/javascript" src="../xheditor_lang/zh-cn.js"></script> <script type="text/javascript"> var editor; $(pageInit); function pageInit() { var allPlugin={ Code:{c:'btnCode',t:'插入代码',h:1,e:function(){ var _this=this; var htmlCode='<div><select id="xheCodeType"><option value="html">HTML/XML</option><option value="js">Javascript</option><option value="css">CSS</option><option value="php">PHP</option><option value="java">Java</option><option value="py">Python</option><option value="pl">Perl</option><option value="rb">Ruby</option><option value="cs">C#</option><option value="c">C++/C</option><option value="vb">VB/ASP</option><option value="">其它</option></select></div><div><textarea id="xheCodeValue" wrap="soft" spellcheck="false" style="width:300px;height:100px;" /></div><div style="text-align:right;"><input type="button" id="xheSave" value="确定" /></div>'; var jCode=$(htmlCode),jType=$('#xheCodeType',jCode),jValue=$('#xheCodeValue',jCode),jSave=$('#xheSave',jCode); jSave.click(function(){ _this.loadBookmark(); _this.pasteHTML('<pre><code class="'+jType.val()+'">'+_this.domEncode(jValue.val())+'</code></pre>'); _this.hidePanel(); return false; }); _this.saveBookmark(); _this.showDialog(jCode); }} }; editor=$('#elm1').xheditor({plugins:allPlugin}); } function submitForm(){$('#frmDemo').submit();} </script> 首先最前面那个style要留着,是定义图标的,把demo9文件夹的prettify文件夹里有一个code.gif复制出来按路径放好。然后只需要把var allPlugin这一串复制到对应的文件里,前后都一样的在function里面,editor=前面,很容易找到。最后把plugins:allPlugin插入到xheditor({})的最后,保存,清理浏览器缓存就可以了。 效果如图: 代码选项那根据highlight.js的语法和自己需要自己调整下就行了,我为了方便直接默认空着让它自动判断了。
-
自制1602时钟更新一个带星期代码 2018-2-5
之前的没有星期显示,这次改了一个带星期显示的。 代码: #include <Wire.h> #include "ds3231_2.h" #include <LiquidCrystal.h> LiquidCrystal lcd(12, 11, 5, 4, 3, 2); //UNO //LiquidCrystal lcd(7, 8, 13, 12, 11, 10);//pro mini #define BUFF_MAX 128 uint8_t time[8]; char recv[BUFF_MAX]; unsigned int recv_size = 0; unsigned long prev, interval = 1000; void setup() { Serial.begin(9600); Wire.begin(); DS3231_init(DS3231_INTCN); memset(recv, 0, BUFF_MAX); Serial.println("GET time"); lcd.begin(16, 2); lcd.clear(); Serial.println("Setting time"); //parse_cmd("T302911604102014",16); } void loop() { char in; char tempF[6]; float temperature; char buff[BUFF_MAX]; unsigned long now = millis(); struct ts t; // show time once in a while if ((now - prev > interval) && (Serial.available() <= 0)) { DS3231_get(&t); //Get time parse_cmd("C",1); temperature = DS3231_get_treg(); //Get temperature dtostrf(temperature, 5, 1, tempF); lcd.clear(); lcd.setCursor(0,0); lcd.print(t.mday); printMonth(t.mon); lcd.print("W:"); lcd.print(t.wday); lcd.print(" "); lcd.print(t.year); lcd.setCursor(0,1); //Go to second line of the LCD Screen lcd.print(t.hour); lcd.print(":"); if(t.min<10) { lcd.print("0"); } lcd.print(t.min); lcd.print(":"); if(t.sec<10) { lcd.print("0"); } lcd.print(t.sec); lcd.print(' '); lcd.print(tempF); lcd.print((char)223); lcd.print("C "); prev = now; } if (Serial.available() > 0) { in = Serial.read(); if ((in == 10 || in == 13) && (recv_size > 0)) { parse_cmd(recv, recv_size); recv_size = 0; recv[0] = 0; } else if (in < 48 || in > 122) {; // ignore ~[0-9A-Za-z] } else if (recv_size > BUFF_MAX - 2) { // drop lines that are too long // drop recv_size = 0; recv[0] = 0; } else if (recv_size < BUFF_MAX - 2) { recv[recv_size] = in; recv[recv_size + 1] = 0; recv_size += 1; } } } void parse_cmd(char *cmd, int cmdsize) { uint8_t i; uint8_t reg_val; char buff[BUFF_MAX]; struct ts t; //snprintf(buff, BUFF_MAX, "cmd was '%s' %d\n", cmd, cmdsize); //Serial.print(buff); // TssmmhhWDDMMYYYY aka set time if (cmd[0] == 84 && cmdsize == 16) { //T355720619112011 t.sec = inp2toi(cmd, 1); t.min = inp2toi(cmd, 3); t.hour = inp2toi(cmd, 5); t.wday = inp2toi(cmd, 7); t.mday = inp2toi(cmd, 8); t.mon = inp2toi(cmd, 10); t.year = inp2toi(cmd, 12) * 100 + inp2toi(cmd, 14); DS3231_set(t); Serial.println("OK"); } else if (cmd[0] == 49 && cmdsize == 1) { // "1" get alarm 1 DS3231_get_a1(&buff[0], 59); Serial.println(buff); } else if (cmd[0] == 50 && cmdsize == 1) { // "2" get alarm 1 DS3231_get_a2(&buff[0], 59); Serial.println(buff); } else if (cmd[0] == 51 && cmdsize == 1) { // "3" get aging register Serial.print("aging reg is "); Serial.println(DS3231_get_aging(), DEC); } else if (cmd[0] == 65 && cmdsize == 9) { // "A" set alarm 1 DS3231_set_creg(DS3231_INTCN | DS3231_A1IE); //ASSMMHHDD for (i = 0; i < 4; i++) { time[i] = (cmd[2 * i + 1] - 48) * 10 + cmd[2 * i + 2] - 48; // ss, mm, hh, dd } byte flags[5] = { 0, 0, 0, 0, 0 }; DS3231_set_a1(time[0], time[1], time[2], time[3], flags); DS3231_get_a1(&buff[0], 59); Serial.println(buff); } else if (cmd[0] == 66 && cmdsize == 7) { // "B" Set Alarm 2 DS3231_set_creg(DS3231_INTCN | DS3231_A2IE); //BMMHHDD for (i = 0; i < 4; i++) { time[i] = (cmd[2 * i + 1] - 48) * 10 + cmd[2 * i + 2] - 48; // mm, hh, dd } byte flags[5] = { 0, 0, 0, 0 }; DS3231_set_a2(time[0], time[1], time[2], flags); DS3231_get_a2(&buff[0], 59); Serial.println(buff); } else if (cmd[0] == 67 && cmdsize == 1) { // "C" - get temperature register Serial.print("temperature reg is "); Serial.println(DS3231_get_treg(), DEC); } else if (cmd[0] == 68 && cmdsize == 1) { // "D" - reset status register alarm flags reg_val = DS3231_get_sreg(); reg_val &= B11111100; DS3231_set_sreg(reg_val); } else if (cmd[0] == 70 && cmdsize == 1) { // "F" - custom fct reg_val = DS3231_get_addr(0x5); Serial.print("orig "); Serial.print(reg_val,DEC); Serial.print("month is "); Serial.println(bcdtodec(reg_val & 0x1F),DEC); } else if (cmd[0] == 71 && cmdsize == 1) { // "G" - set aging status register DS3231_set_aging(0); } else if (cmd[0] == 83 && cmdsize == 1) { // "S" - get status register Serial.print("status reg is "); Serial.println(DS3231_get_sreg(), DEC); } else { Serial.print("unknown command prefix "); Serial.println(cmd[0]); Serial.println(cmd[0], DEC); } } void printMonth(int month) { switch(month) { case 1: lcd.print(" M:1 ");break; case 2: lcd.print(" M:2 ");break; case 3: lcd.print(" M:3 ");break; case 4: lcd.print(" M:4 ");break; case 5: lcd.print(" M:5 ");break; case 6: lcd.print(" M:6 ");break; case 7: lcd.print(" M:7 ");break; case 8: lcd.print(" M:8 ");break; case 9: lcd.print(" M:9 ");break; case 10: lcd.print(" M:10 ");break; case 11: lcd.print(" M:11 ");break; case 12: lcd.print(" M:12 ");break; default: lcd.print(" Error ");break; } } 显示效果(M代表月份,W代表星期):
-
Digispark开发板制作启动密钥 2018-2-1
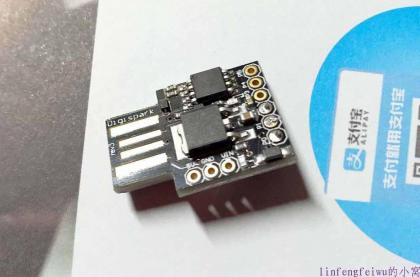
这是个非常迷你的开发板,无意中看到的,就顺带买了个玩玩。 这次要做一个电脑开机密码自动输入装置,虽然我现在电脑都是指纹了,不过拿来玩玩还是可以的。只要插上电脑,按一下按钮就OK了。 硬件准备: Digispark一块 按钮一个 10KΩ电阻一个 将按钮焊接在p0和p2两脚,将电阻焊接在p0和p1两脚即可。 使用Arduino IDE为Digispark编程: 在首选项里添加附加开发板,输入http://digistump.com/package_digistump_index.json 驱动下载:https://github.com/digistump/DigistumpArduino/tree/master/tools 保存后去开发板管理里添加Digispark,编程时选默认的第一个就行。注意,这个板子要先点击上传,再插入电脑,才能正常的烧录程序。 代码: #include "DigiKeyboard.h" void setup() { pinMode(0, INPUT); pinMode(1, OUTPUT); pinMode(2, OUTPUT); digitalWrite(1, LOW); digitalWrite(2, HIGH); // Makes OS identify this device as keyboard DigiKeyboard.sendKeyStroke(0); } void loop() { if(digitalRead(0) == HIGH) { insertPassword(); } } // Example to use Digispark as physical password token void insertPassword() { DigiKeyboard.println("password"); delay (500); } 我焊的效果图: 每次按一下按钮就会自动输入密码啦~ 参考链接:https://www.youtube.com/watch?v=trx5ZWl9i3Q

